Difference between revisions of "การสร้าง Hotspot และตั้งค่าเชื่อมใน Mikrotik"
From EasyZone wiki
Easyhorpak (talk | contribs) |
Easyhorpak (talk | contribs) |
||
| (4 intermediate revisions by the same user not shown) | |||
| Line 13: | Line 13: | ||
[[File:Mikrotik Hotspot-10.jpg|400px|thumb|center]] | [[File:Mikrotik Hotspot-10.jpg|400px|thumb|center]] | ||
| − | 4. ทำการแก้ไขค่า Hotspot profile | + | [[File:Mikrotik Hotspot-11.jpg|400px|thumb|center]] |
| + | |||
| + | [[File:Mikrotik Hotspot-12.jpg|400px|thumb|center]] | ||
| + | |||
| + | [[File:Mikrotik Hotspot-13.jpg|400px|thumb|center]] | ||
| + | |||
| + | [[File:Mikrotik Hotspot-15.jpg|400px|thumb|center]] | ||
| + | |||
| + | [[File:Mikrotik Hotspot-16.jpg|400px|thumb|center]] | ||
| + | |||
| + | [[File:Mikrotik Hotspot-18.jpg|400px|thumb|center]] | ||
| + | |||
| + | |||
| + | |||
| + | 4. ทำการแก้ไขค่า Hotspot profile | ||
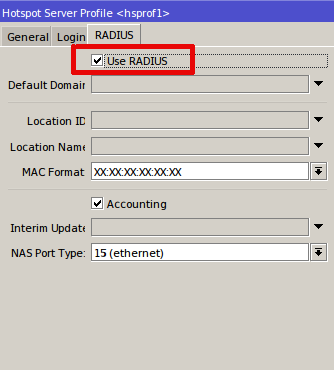
5. ทำการตั้งค่า use radius เพื่อให้เชื่อม Radius ตามภาพ | 5. ทำการตั้งค่า use radius เพื่อให้เชื่อม Radius ตามภาพ | ||
| + | [[File:Hotspot.png|400px|thumb|center]] | ||
ขอบคุณภาพประกอบจาก https://www.techtoday.in.th/%E0%B8%A7%E0%B8%B4%E0%B8%98%E0%B8%B5%E0%B8%97%E0%B8%B3-hotspot-server-%E0%B8%AA%E0%B8%B3%E0%B8%AB%E0%B8%A3%E0%B8%B1%E0%B8%9A%E0%B9%81%E0%B8%88%E0%B8%81%E0%B8%88%E0%B9%88%E0%B8%B2%E0%B8%A2%E0%B8%AD%E0%B8%B4%E0%B8%99%E0%B9%80%E0%B8%95%E0%B8%AD%E0%B8%A3%E0%B9%8C%E0%B9%80%E0%B8%99%E0%B9%87%E0%B8%95-%E0%B8%9A%E0%B8%99-mikrotik/ | ขอบคุณภาพประกอบจาก https://www.techtoday.in.th/%E0%B8%A7%E0%B8%B4%E0%B8%98%E0%B8%B5%E0%B8%97%E0%B8%B3-hotspot-server-%E0%B8%AA%E0%B8%B3%E0%B8%AB%E0%B8%A3%E0%B8%B1%E0%B8%9A%E0%B9%81%E0%B8%88%E0%B8%81%E0%B8%88%E0%B9%88%E0%B8%B2%E0%B8%A2%E0%B8%AD%E0%B8%B4%E0%B8%99%E0%B9%80%E0%B8%95%E0%B8%AD%E0%B8%A3%E0%B9%8C%E0%B9%80%E0%B8%99%E0%B9%87%E0%B8%95-%E0%B8%9A%E0%B8%99-mikrotik/ | ||
Latest revision as of 11:32, 27 June 2019
มีวิธีการดังต่อไปนี้ 1. ทำการ login เข้า winbox
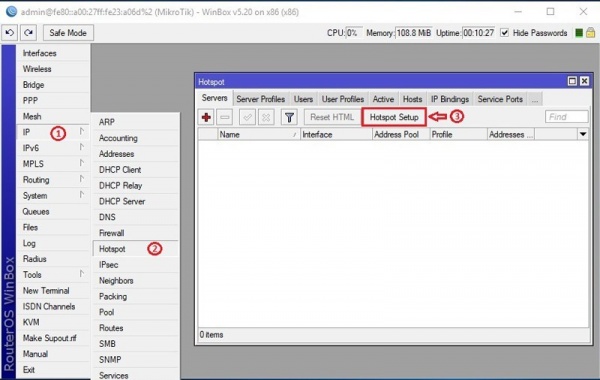
2. เลือกที่เมนู IP > Hotspot
3. กดที่เมนู Hotspot Setup
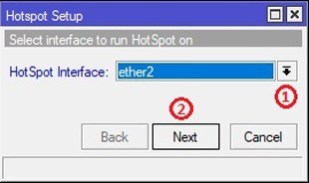
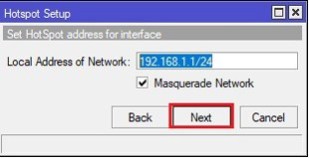
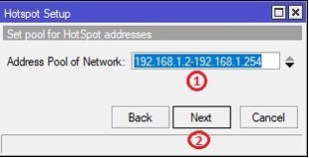
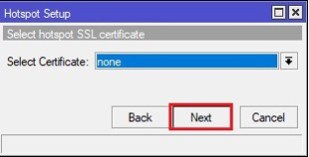
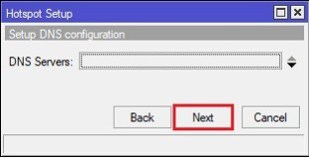
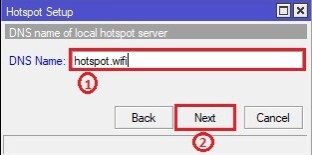
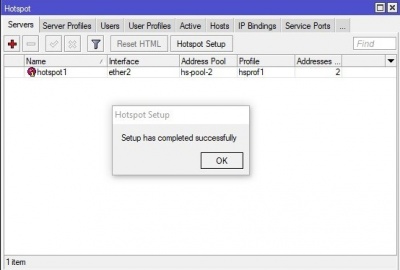
ทำการตั้งค่า ตามภาพ
4. ทำการแก้ไขค่า Hotspot profile
5. ทำการตั้งค่า use radius เพื่อให้เชื่อม Radius ตามภาพ
