Difference between revisions of "การตั้งค่า EAP Authentication สำหรับ Ruckus ZoneDirect"
Easyhorpak (talk | contribs) (Created page with " การตั้งค่า EAP Authentication สำหรับ Ruckus ZoneDirect 600px|thumb|center '''มีวิธีการด...") |
Easyhorpak (talk | contribs) |
||
| (8 intermediate revisions by the same user not shown) | |||
| Line 5: | Line 5: | ||
'''มีวิธีการดังต่อไปนี้''' | '''มีวิธีการดังต่อไปนี้''' | ||
| + | |||
1. Login เข้าระบบ Zonedirect | 1. Login เข้าระบบ Zonedirect | ||
| + | |||
2. ทำการตั้งค่า AAA Servers | 2. ทำการตั้งค่า AAA Servers | ||
| + | |||
| + | - ตั้งค่า Radius Authentication Server | ||
| + | |||
| + | - กด Create new และตั้งค่าดังนี้ | ||
| + | |||
| + | Name = EasyZone Authen | ||
| + | |||
| + | Type = Radius | ||
| + | |||
| + | Ip address = 188.166.176.10 | ||
| + | |||
| + | Port = 1812 | ||
| + | |||
| + | |||
| + | |||
| + | หลังจากนั้นกด OK | ||
| + | |||
| + | |||
| + | |||
| + | - ตั้งค่า Radius Accounting Server | ||
| + | |||
| + | - กด Create new และตั้งค่าดังนี้ | ||
| + | |||
| + | Name = EasyZone Accouting | ||
| + | |||
| + | Type = Radius Accouting | ||
| + | |||
| + | Ip address = 188.166.176.10 | ||
| + | |||
| + | Port = 1813 | ||
| + | |||
| + | หลังจากนั้นกด OK | ||
| + | |||
| + | [[File:R1.png|600px|thumb|center]] | ||
| + | |||
3. ทำการตั้งค่า WLANS | 3. ทำการตั้งค่า WLANS | ||
| + | ทำการตั้งค่า ดังนี้ | ||
| + | |||
| + | กด Create New | ||
| + | |||
| + | NAME = ชื่อท่านต้องการตั้ง | ||
| + | |||
| + | SSID = SSID ที่ท่านต้องการ | ||
| + | |||
| + | Type = Standard Usage | ||
| + | |||
| + | Authentication Options | ||
| + | |||
| + | Method = 802.1x EAP | ||
| + | |||
| + | Encryptions Optionts | ||
| + | |||
| + | Method = WPA2 | ||
| + | |||
| + | Algorithm = AES | ||
| + | |||
| + | Authentication Servet = EasyZone Authen (ตามที่เราสร้างไว้) | ||
| + | |||
| + | Accounting Server = EasyZone Accounting (ตามที่เราสร้างไว้) | ||
| + | |||
| + | VLAN ID = เลือก vlan id ของท่าน และ เลือก Enable Dynamic VLAN | ||
| + | |||
| + | Inactivity Timeout = 30 | ||
| + | |||
| + | กด OK | ||
| + | |||
| + | [[File:R4.png|600px|thumb|center]] | ||
| + | |||
| + | [[File:R5.png|600px|thumb|center]] | ||
4. เสร็จสิ้นขั้นตอนการตั้งค่า | 4. เสร็จสิ้นขั้นตอนการตั้งค่า | ||
Latest revision as of 19:39, 21 December 2017
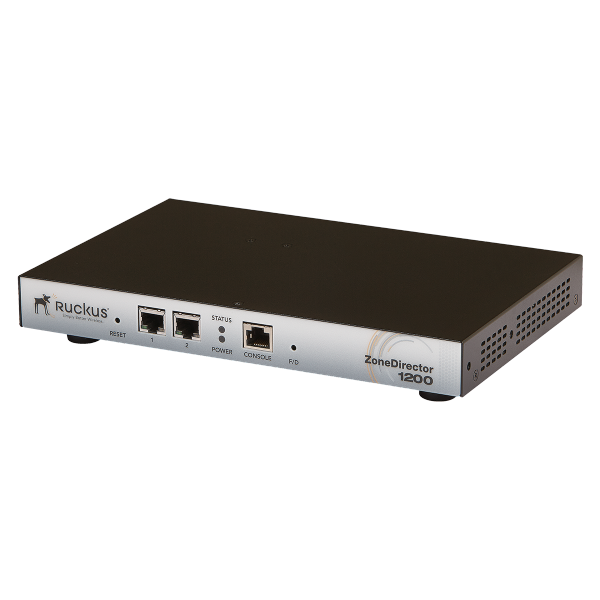
การตั้งค่า EAP Authentication สำหรับ Ruckus ZoneDirect
มีวิธีการดังต่อไปนี้
1. Login เข้าระบบ Zonedirect
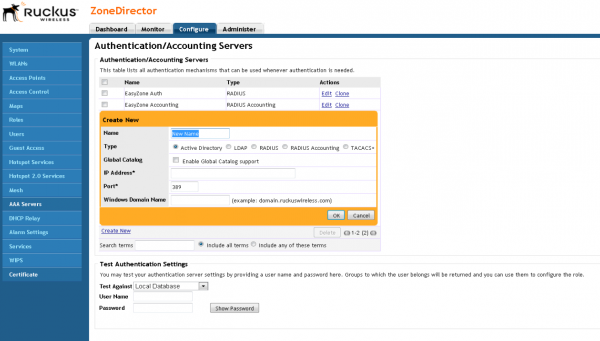
2. ทำการตั้งค่า AAA Servers
- ตั้งค่า Radius Authentication Server
- กด Create new และตั้งค่าดังนี้
Name = EasyZone Authen
Type = Radius
Ip address = 188.166.176.10
Port = 1812
หลังจากนั้นกด OK
- ตั้งค่า Radius Accounting Server
- กด Create new และตั้งค่าดังนี้
Name = EasyZone Accouting
Type = Radius Accouting
Ip address = 188.166.176.10
Port = 1813
หลังจากนั้นกด OK
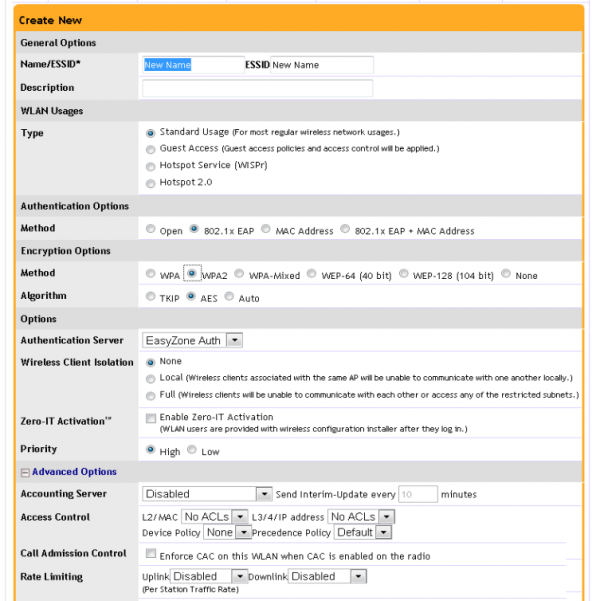
3. ทำการตั้งค่า WLANS
ทำการตั้งค่า ดังนี้
กด Create New
NAME = ชื่อท่านต้องการตั้ง
SSID = SSID ที่ท่านต้องการ
Type = Standard Usage
Authentication Options
Method = 802.1x EAP
Encryptions Optionts
Method = WPA2
Algorithm = AES
Authentication Servet = EasyZone Authen (ตามที่เราสร้างไว้)
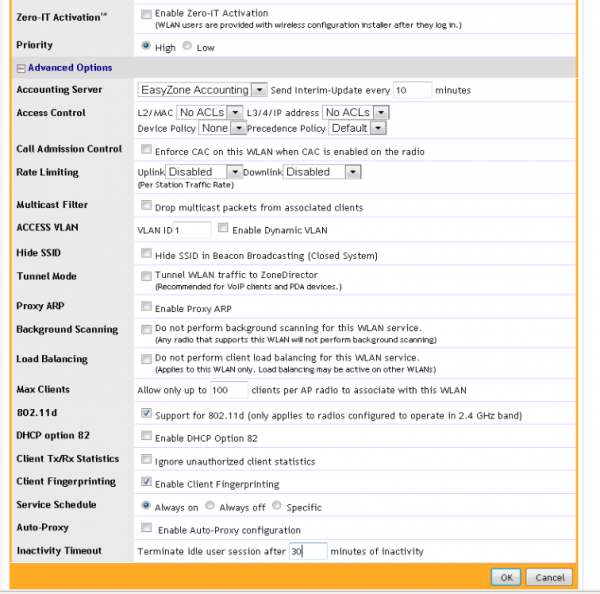
Accounting Server = EasyZone Accounting (ตามที่เราสร้างไว้)
VLAN ID = เลือก vlan id ของท่าน และ เลือก Enable Dynamic VLAN
Inactivity Timeout = 30
กด OK
4. เสร็จสิ้นขั้นตอนการตั้งค่า


