Difference between revisions of "การตั้งค่า EAP Authentication สำหรับ Ruijie Cloud Controller"
From EasyZone wiki
Easyhorpak (talk | contribs) |
Easyhorpak (talk | contribs) |
||
| (2 intermediate revisions by the same user not shown) | |||
| Line 14: | Line 14: | ||
[[File:Screenshot from 2020-11-05 11-40-59.png|800px|thumb|center]] | [[File:Screenshot from 2020-11-05 11-40-59.png|800px|thumb|center]] | ||
| − | 5. ที่เมนู Primary Server กดที่ปุ่มเครื่องหมาย + บนหน้าเว็บ เพื่อเพิ่มข้อมูล เซอเวอร์ ตามภาพ | + | 5. ที่เมนู Primary Server กดที่ปุ่มเครื่องหมาย + บนหน้าเว็บ เพื่อเพิ่มข้อมูล เซอเวอร์ ตามภาพ แล้วกด Save |
[[File:Screenshot from 2020-11-05 11-41-46.png|800px|thumb|center]] | [[File:Screenshot from 2020-11-05 11-41-46.png|800px|thumb|center]] | ||
6. ทำการเลือก Server | 6. ทำการเลือก Server | ||
| + | |||
| + | [[File:Screenshot from 2020-11-05 11-42-01.png|800px|thumb|center]] | ||
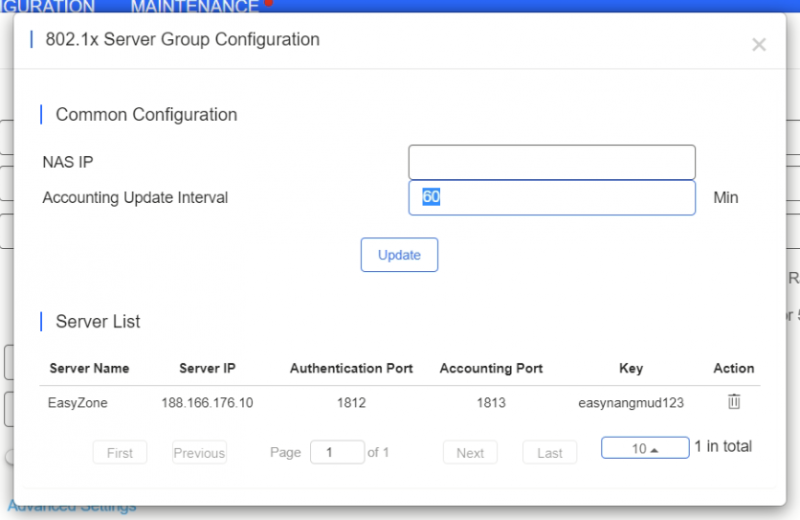
7. กดเมนู Advance Setting แก้ไข Accounting Update Interval เป็น 60 ms ตามภาพ หลังจากนั้นกด Update | 7. กดเมนู Advance Setting แก้ไข Accounting Update Interval เป็น 60 ms ตามภาพ หลังจากนั้นกด Update | ||
| + | |||
| + | [[File:Screenshot from 2020-11-05 11-42-30.png|800px|thumb|center]] | ||
8. หลังจากนั้นกด Ok | 8. หลังจากนั้นกด Ok | ||
| + | |||
| + | [[File:Screenshot from 2020-11-05 11-40-59.png|800px|thumb|center]] | ||
9. ทำการกดเมนู Save เป็นเสร็จขั้นตอนการตั้งค่า | 9. ทำการกดเมนู Save เป็นเสร็จขั้นตอนการตั้งค่า | ||
| + | |||
| + | [[File:Screenshot from 2020-11-05 11-42-54.png|800px|thumb|center]] | ||
10. ทำการส่งค่า Mac address ของ Access Point มาให้ทีมงาน เพื่อเพิ่มเข้าระบบ Cloud EAP | 10. ทำการส่งค่า Mac address ของ Access Point มาให้ทีมงาน เพื่อเพิ่มเข้าระบบ Cloud EAP | ||
Latest revision as of 11:51, 5 November 2020
มีวิธีการดังต่อไปนี้
1. ทำการ Login เข้าระบบ Cloud Controller
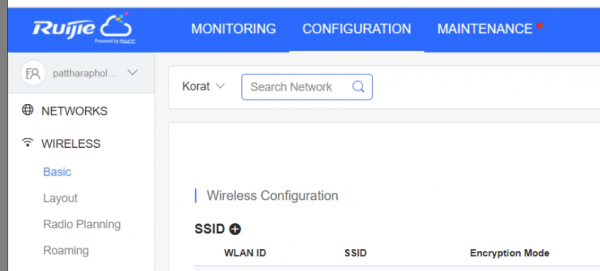
2. กดที่เมนู Configuration
3. กดที่ปุ่มเครื่องหมาย + บนหน้าเว็บ เพื่อเพิ่ม SSID
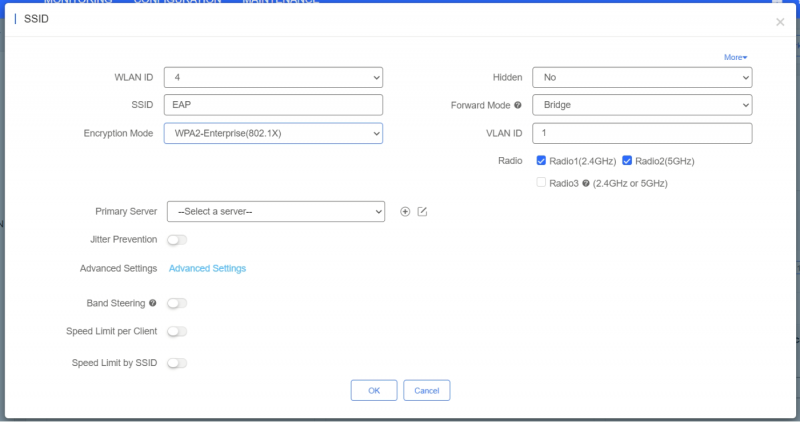
4. กรอก SSID ที่ท่านต้องการ เลือกระบบ Encryption Mode เป็น WPA2-Enterprise(802.1x)
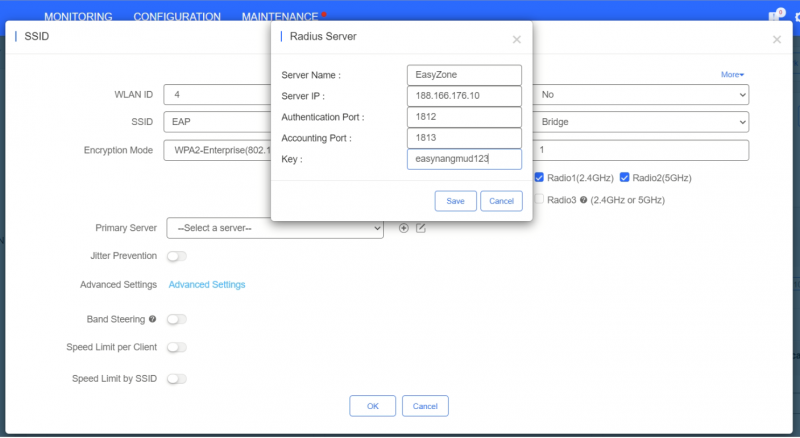
5. ที่เมนู Primary Server กดที่ปุ่มเครื่องหมาย + บนหน้าเว็บ เพื่อเพิ่มข้อมูล เซอเวอร์ ตามภาพ แล้วกด Save
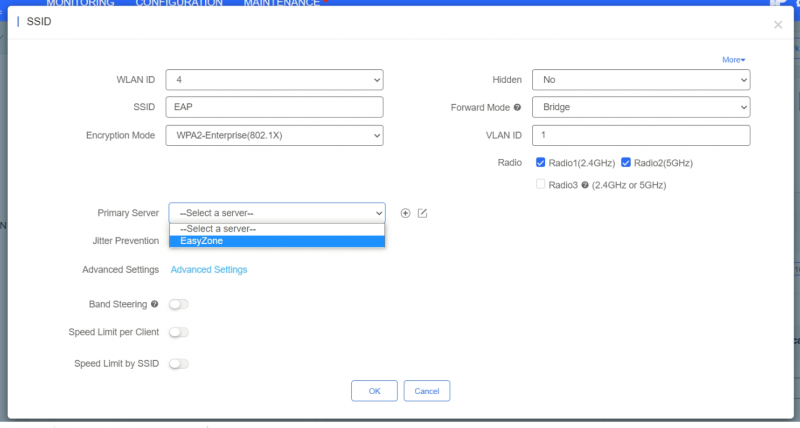
6. ทำการเลือก Server
7. กดเมนู Advance Setting แก้ไข Accounting Update Interval เป็น 60 ms ตามภาพ หลังจากนั้นกด Update
8. หลังจากนั้นกด Ok
9. ทำการกดเมนู Save เป็นเสร็จขั้นตอนการตั้งค่า
10. ทำการส่งค่า Mac address ของ Access Point มาให้ทีมงาน เพื่อเพิ่มเข้าระบบ Cloud EAP
