Difference between revisions of "การสร้างระบบ Mac authen"
From EasyZone wiki
Easyhorpak (talk | contribs) (Created page with "การสร้าง billing plan แบบ mac authen เพื่อนำไปใช้สร้าง account แบบ mac authen ให้อุปกรณ์ เ...") |
Easyhorpak (talk | contribs) |
||
| Line 1: | Line 1: | ||
การสร้าง billing plan แบบ mac authen เพื่อนำไปใช้สร้าง account แบบ mac authen ให้อุปกรณ์ เข้าใช้งานได้ โดยไม่ต้องเปิดหน้า web login | การสร้าง billing plan แบบ mac authen เพื่อนำไปใช้สร้าง account แบบ mac authen ให้อุปกรณ์ เข้าใช้งานได้ โดยไม่ต้องเปิดหน้า web login | ||
| − | + | ([http://bill.cloud-hotspot.com/wiki/index.php/%E0%B8%81%E0%B8%B2%E0%B8%A3%E0%B8%AA%E0%B8%A3%E0%B9%89%E0%B8%B2%E0%B8%87_account_%E0%B9%81%E0%B8%9A%E0%B8%9A_Mac_authen คู่มือการสร้าง account แบบ Mac authen]) | |
วิธีการมีดังต่อไปนี้ | วิธีการมีดังต่อไปนี้ | ||
Revision as of 12:49, 24 August 2017
การสร้าง billing plan แบบ mac authen เพื่อนำไปใช้สร้าง account แบบ mac authen ให้อุปกรณ์ เข้าใช้งานได้ โดยไม่ต้องเปิดหน้า web login
(คู่มือการสร้าง account แบบ Mac authen)
วิธีการมีดังต่อไปนี้
1. Login เข้าสู่ระบบ Cloud
2. เลือก Hotspot ที่ต้องการจัดการ
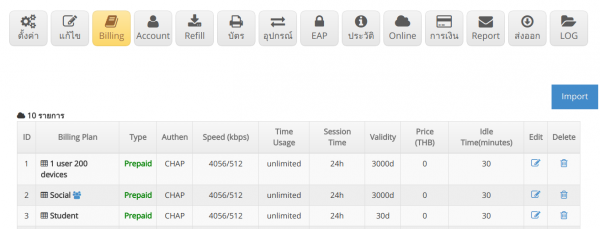
3. กดเข้าเมนู Billing
4. เลือกสร้าง Billing plan ในที่นี้จะตั้งค่า billing plan 365 วัน กำหนด จำกัดชั่วโมงใช้งาน 3 ชั่วโมง ต่อวัน โดยกำหนดค่าดังนี้
ประเภท Plan : เลือก prepaid หรือ postpaid
ชื่อ Plan: ตั้งชื่อ plan ของท่าน
Download : กำหนด speed download
Upload : กำหนด speed upload
ระยะเวลาใช้งาน : กำหนดระยะเวลาการใช้งาน ตั้งค่าเป็น 365 วัน
ราคา : ไม่ต้องกำหนด
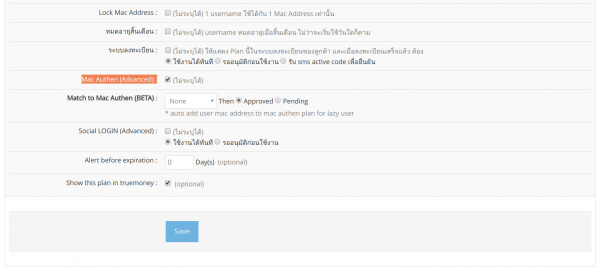
5. กดปุ่ม Advance setting
Mac Authen (Advanced) : ทำเครื่องหมายถูก
5. กด Save


