Difference between revisions of "การสร้าง Billing plan แบบรายวัน,รายเดือน"
From EasyZone wiki
Easyhorpak (talk | contribs) (Created page with "วิธีการมีดังต่อไปนี้ 1. Login เข้าสู่ระบบ Cloud 2. เลือก Hotspot ที่ต้องการจั...") |
Easyhorpak (talk | contribs) |
||
| Line 9: | Line 9: | ||
[[File:Bill.png|600px|thumb|center]] | [[File:Bill.png|600px|thumb|center]] | ||
| − | 4. เลือกสร้าง | + | 4. เลือกสร้าง Billing plan โดยกำหนดค่าดังนี้ |
| − | [[File: | + | [[File:Moth.png|600px|thumb|center]] |
| − | Plan | + | ประเภท Plan : เลือก prepaid หรือ postpaid |
| − | + | ชื่อ Plan: ตั้งชื่อ plan ของท่าน | |
| − | + | Download : กำหนด speed download | |
| − | + | Upload : กำหนด speed upload | |
| − | + | ระยะเวลาใช้งาน : กำหนดระยะเวลาการใช้งาน | |
| − | 5. กด ''' | + | ราคา : กำหนดราคา |
| + | |||
| + | 5. กด '''Save''' | ||
Latest revision as of 11:38, 24 August 2017
วิธีการมีดังต่อไปนี้
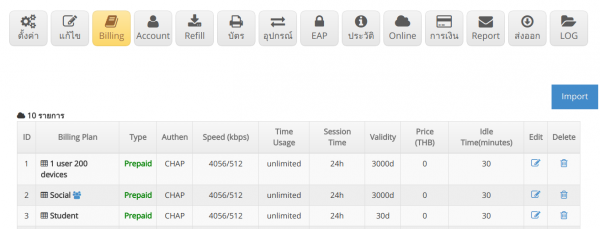
1. Login เข้าสู่ระบบ Cloud
2. เลือก Hotspot ที่ต้องการจัดการ
3. กดเข้าเมนู Billing
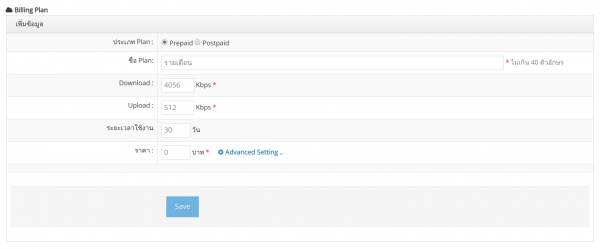
4. เลือกสร้าง Billing plan โดยกำหนดค่าดังนี้
ประเภท Plan : เลือก prepaid หรือ postpaid
ชื่อ Plan: ตั้งชื่อ plan ของท่าน
Download : กำหนด speed download
Upload : กำหนด speed upload
ระยะเวลาใช้งาน : กำหนดระยะเวลาการใช้งาน
ราคา : กำหนดราคา
5. กด Save

