Difference between revisions of "คู่มือการ active license EasyZone Cloud AP"
From EasyZone wiki
Easyhorpak (talk | contribs) (Created page with "มีวิธีการดังต่อไปนี้ 1. Login เข้าสู่ระบบ Cloud 2. เลือก hotspot ที่ต้องการ activ...") |
Easyhorpak (talk | contribs) |
||
| (4 intermediate revisions by the same user not shown) | |||
| Line 2: | Line 2: | ||
1. Login เข้าสู่ระบบ Cloud | 1. Login เข้าสู่ระบบ Cloud | ||
| + | |||
| + | [[File:Screenshot from 2019-10-29 11-55-41.png|800px|thumb|center]] | ||
2. เลือก hotspot ที่ต้องการ active license | 2. เลือก hotspot ที่ต้องการ active license | ||
| + | |||
| + | [[File:Screenshot from 2019-10-29 11-56-30.png|800px|thumb|center]] | ||
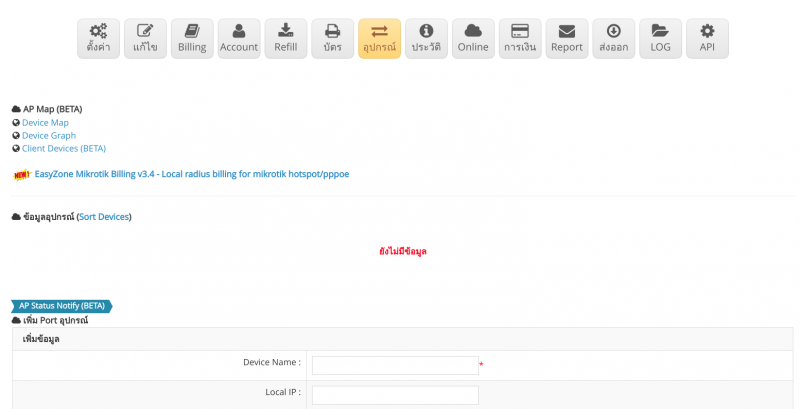
3. ไปที่เมนู Device | 3. ไปที่เมนู Device | ||
| − | 4. ทำการเพิ่ม cloud profile | + | [[File:Screenshot from 2019-10-29 11-56-30.png|800px|thumb|center]] |
| + | |||
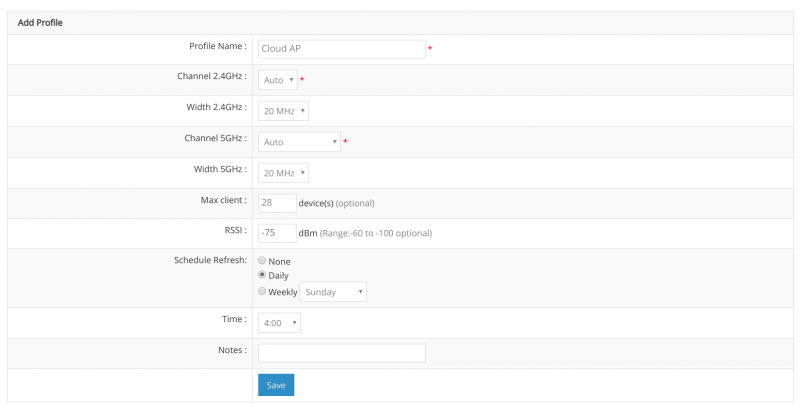
| + | 4. ทำการเพิ่ม cloud profile ตามภาพ หรือกำหนดค่าตามต้องการ | ||
| + | |||
| + | [[File:Screenshot from 2019-10-29 11-57-49.png|800px|thumb|center]] | ||
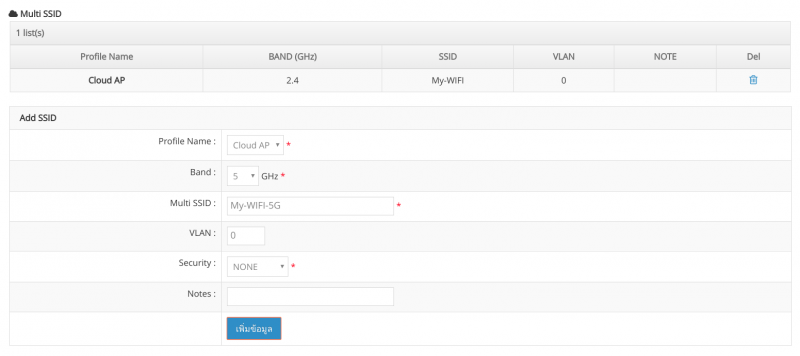
| − | 5. ทำการเพิ่ม multi ssid | + | 5. ทำการเพิ่ม multi ssid |
| + | |||
| + | [[File:Screenshot from 2019-10-29 11-59-58.png|800px|thumb|center]] | ||
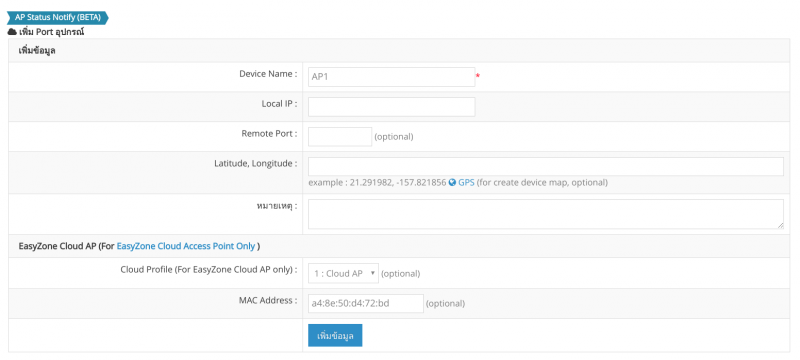
ุ6. ทำการเพิ่ม ข้อมูลอุปกรณ์ โดยเลือก cloud profile ที่ตั้งค่าไว้ ตามภาพ | ุ6. ทำการเพิ่ม ข้อมูลอุปกรณ์ โดยเลือก cloud profile ที่ตั้งค่าไว้ ตามภาพ | ||
| + | |||
| + | [[File:Screenshot from 2019-10-29 12-01-56.png|800px|thumb|center]] | ||
Latest revision as of 12:02, 29 October 2019
มีวิธีการดังต่อไปนี้
1. Login เข้าสู่ระบบ Cloud
2. เลือก hotspot ที่ต้องการ active license
3. ไปที่เมนู Device
4. ทำการเพิ่ม cloud profile ตามภาพ หรือกำหนดค่าตามต้องการ
5. ทำการเพิ่ม multi ssid
ุ6. ทำการเพิ่ม ข้อมูลอุปกรณ์ โดยเลือก cloud profile ที่ตั้งค่าไว้ ตามภาพ


