Difference between revisions of "การตั้งค่า SSL Certificate ทำ Login by HTTPS สำหรับ Mikrotik Hotspot Login"
Easyhorpak (talk | contribs) |
Easyhorpak (talk | contribs) |
||
| Line 9: | Line 9: | ||
3. ทำการ import Certificate โดยที่เมนู /system > certificates กด import | 3. ทำการ import Certificate โดยที่เมนู /system > certificates กด import | ||
| − | เลือก file star.cloud-hotspot.com.crt | + | เลือก file star.cloud-hotspot.com.crt กด Import |
| + | |||
| + | [[File:Crt.png|600px|thumb|center]] | ||
เลือก file star.cloud-hotspot.com.ca-bundle | เลือก file star.cloud-hotspot.com.ca-bundle | ||
| + | |||
| + | [[File:Bd.png|600px|thumb|center]] | ||
เลือก file cl.key | เลือก file cl.key | ||
| + | |||
| + | [[File:K.png|600px|thumb|center]] | ||
4. ทำการตั้งค่า service ssl 443 โดยไปที่เมนู ip > service เลือก Certificate ตามภาพ หลังจากนั้นกด OK | 4. ทำการตั้งค่า service ssl 443 โดยไปที่เมนู ip > service เลือก Certificate ตามภาพ หลังจากนั้นกด OK | ||
Revision as of 17:01, 13 April 2018
การตั้งค่า SSL Certificate ทำ Login by HTTPS สำหรับ Mikrotik Hotspot Login
มีวิธีการดังต่อไปนี้
1. ดาวโหลดน์ไฟล์ SSL Certificate
2. ทำการอัปโหลดไฟล์ไปยังอุปกรณ์ mikrotk ผ่าน winbox
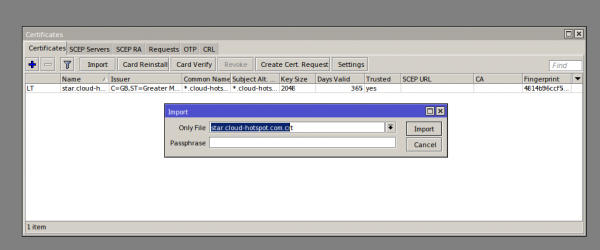
3. ทำการ import Certificate โดยที่เมนู /system > certificates กด import
เลือก file star.cloud-hotspot.com.crt กด Import
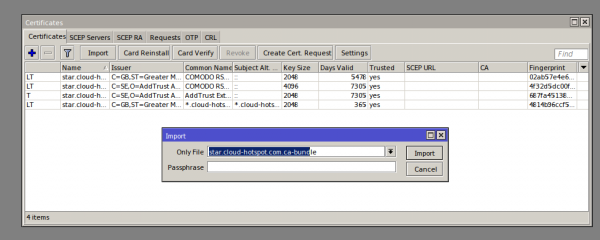
เลือก file star.cloud-hotspot.com.ca-bundle
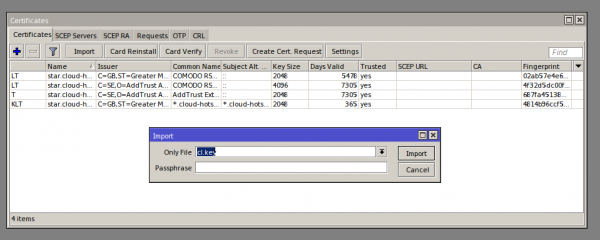
เลือก file cl.key
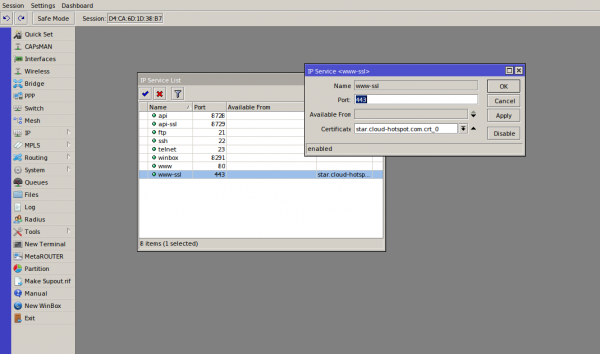
4. ทำการตั้งค่า service ssl 443 โดยไปที่เมนู ip > service เลือก Certificate ตามภาพ หลังจากนั้นกด OK
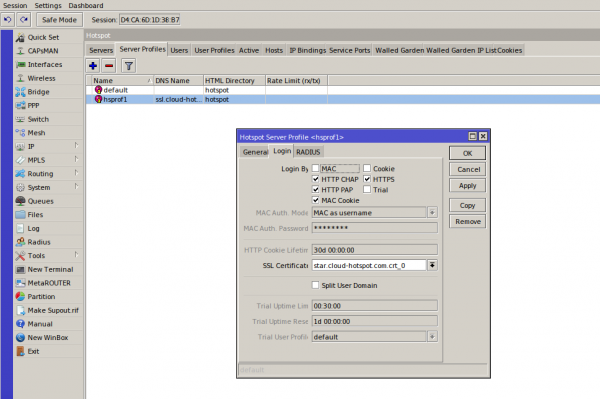
5. ทำการตั้งค่า login by https โดยเข้าไปที่เมนู /ip > hotspot > server profile > เลือก profile และ ทำเครื่องหมายถูกที่ login by https และเลือก Certificate ตามภาพ หลังจากนั้นกด OK
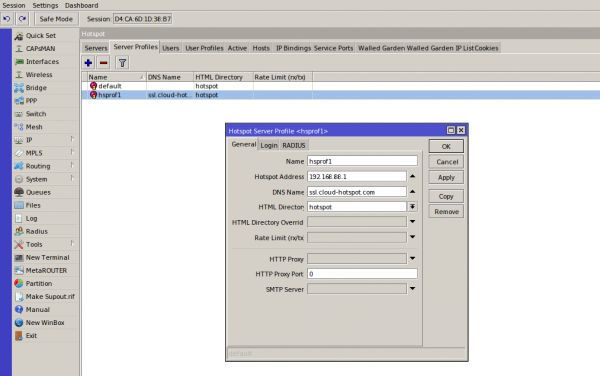
6.ตั้งค่า dns name เป็น ssl.cloud-hotspot.com โดยไปที่ ตามภาพ /ip > hotspot > server profile > general > dns name ตามภาพ
7. Login เข้าระบบ cloud ของ easyzone และทำการสร้าง billing plan และกำหนด auth type เป็น PAP ในเมนู billing > advance setting
