Difference between revisions of "การตั้งค่า SSL Certificate ทำ Login by HTTPS สำหรับ Mikrotik Hotspot Login"
Easyhorpak (talk | contribs) (Created page with "'''การตั้งค่า SSL Certificate ทำ Login by HTTPS สำหรับ Mikrotik Hotspot Login''' มีวิธีการดังต่อไปนี...") |
Easyhorpak (talk | contribs) |
||
| (30 intermediate revisions by the same user not shown) | |||
| Line 1: | Line 1: | ||
| − | |||
| − | + | '''การตั้งค่า SSL Certificate ทำการ Login by HTTPS สำหรับ Mikrotik Hotspot Login''' | |
| − | + | '''มีวิธีการดังต่อไปนี้''' | |
| − | + | 1. ดาวโหลดน์ไฟล์ SSL Certificate (ลูกค้า EasyZone กรุณาติดต่อขอไฟล์ ผ่าน LINE ID : easyzone) | |
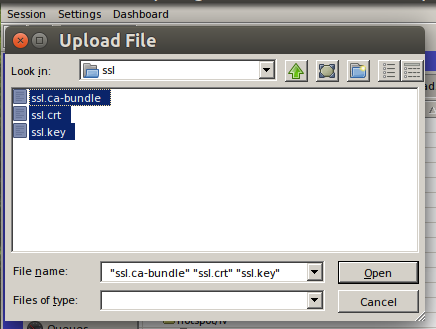
| − | + | 2. ทำการอัปโหลดไฟล์ไปยังอุปกรณ์ mikrotk ผ่าน winbox โดยไปที่เมนู /File > Upload | |
| − | 4. | + | |
| + | [[File:Screenshot from 2021-03-10 13-02-38.png|600px|thumb|center]] | ||
| + | |||
| + | 3. ทำการ import Certificate โดยไปที่เมนู /system > certificates กด import | ||
| + | |||
| + | เลือก file ssl.crt กด Import | ||
| + | |||
| + | [[File:Screenshot from 2021-03-10 13-12-28.png|800px|thumb|center]] | ||
| + | |||
| + | เลือก file ssl.ca-bundle | ||
| + | |||
| + | [[File:Screenshot from 2021-03-10 13-04-25.png|800px|thumb|center]] | ||
| + | |||
| + | เลือก file cl.key | ||
| + | |||
| + | [[File:Screenshot from 2021-03-10 13-04-47.png|800px|thumb|center]] | ||
| + | |||
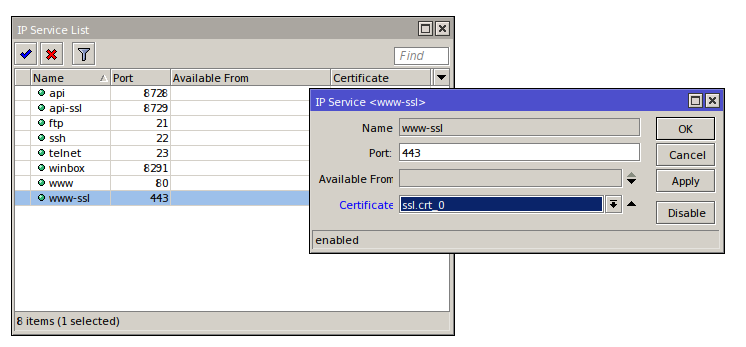
| + | 4. ทำการกด '''Enable''' sservice ssl และตั้งค่า service ssl 443 โดยไปที่เมนู ip > service เลือก Certificate ตามภาพ หลังจากนั้นกด OK | ||
| + | |||
| + | [[File:Screenshot from 2021-03-10 13-07-05.png|800px|thumb|center]] | ||
| + | |||
| + | 5. ทำการตั้งค่า login by https โดยเข้าไปที่เมนู /ip > hotspot > server profile > เลือก profile และ ทำเครื่องหมายถูกที่ login by https และเลือก Certificate ตามภาพ หลังจากนั้นกด OK | ||
| + | |||
| + | '''โดยให้นำ เครื่องหมายถูก หน้า Login by HTTP CHAP ออก และทำเครื่องหมายถูก ในช่องต่าง ๆ ตามภาพ''' | ||
| + | |||
| + | [[File:Screenshot from 2021-03-10 13-06-20.png|800px|thumb|center]] | ||
| + | |||
| + | |||
| + | |||
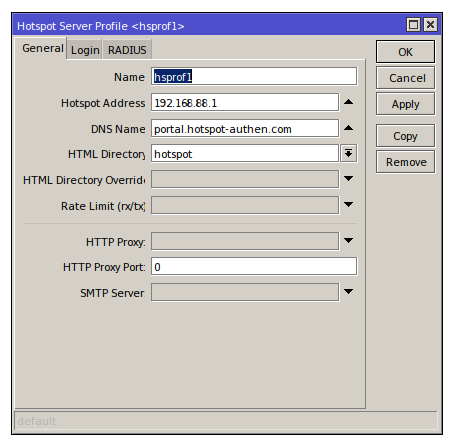
| + | 6.ตั้งค่า dns name เป็น '''portal.hotspot-authen.com''' โดยไปที่เมนู /ip > hotspot > server profile > general > dns name ตามภาพ | ||
| + | |||
| + | [[File:Screenshot from 2021-03-10 13-06-34.png|800px|thumb|center]] | ||
| + | |||
| + | 7. Login เข้าระบบ cloud ของ easyzone และทำการสร้าง billing plan และกำหนด auth type เป็น PAP ในเมนู billing > advance setting เพื่อให้ระบบสามารถ Login by HTTPS ได้ หลังจากนั้นกด Save เป็นอันเสร็จขั้นตอนการตั้งค่า | ||
| + | [[File:Pap.png|600px|thumb|center]] | ||
Latest revision as of 13:09, 10 March 2021
การตั้งค่า SSL Certificate ทำการ Login by HTTPS สำหรับ Mikrotik Hotspot Login
มีวิธีการดังต่อไปนี้
1. ดาวโหลดน์ไฟล์ SSL Certificate (ลูกค้า EasyZone กรุณาติดต่อขอไฟล์ ผ่าน LINE ID : easyzone)
2. ทำการอัปโหลดไฟล์ไปยังอุปกรณ์ mikrotk ผ่าน winbox โดยไปที่เมนู /File > Upload
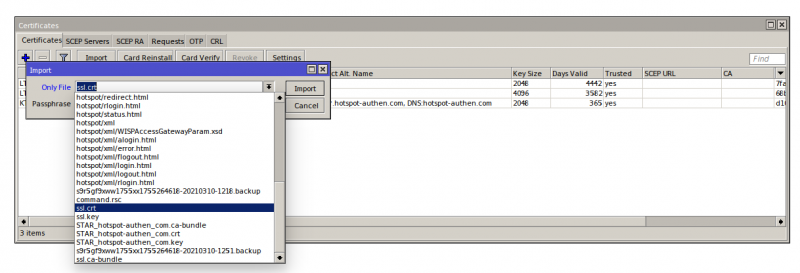
3. ทำการ import Certificate โดยไปที่เมนู /system > certificates กด import
เลือก file ssl.crt กด Import
เลือก file ssl.ca-bundle
เลือก file cl.key
4. ทำการกด Enable sservice ssl และตั้งค่า service ssl 443 โดยไปที่เมนู ip > service เลือก Certificate ตามภาพ หลังจากนั้นกด OK
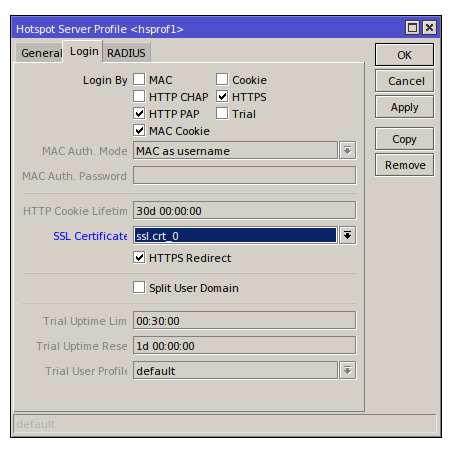
5. ทำการตั้งค่า login by https โดยเข้าไปที่เมนู /ip > hotspot > server profile > เลือก profile และ ทำเครื่องหมายถูกที่ login by https และเลือก Certificate ตามภาพ หลังจากนั้นกด OK
โดยให้นำ เครื่องหมายถูก หน้า Login by HTTP CHAP ออก และทำเครื่องหมายถูก ในช่องต่าง ๆ ตามภาพ
6.ตั้งค่า dns name เป็น portal.hotspot-authen.com โดยไปที่เมนู /ip > hotspot > server profile > general > dns name ตามภาพ
7. Login เข้าระบบ cloud ของ easyzone และทำการสร้าง billing plan และกำหนด auth type เป็น PAP ในเมนู billing > advance setting เพื่อให้ระบบสามารถ Login by HTTPS ได้ หลังจากนั้นกด Save เป็นอันเสร็จขั้นตอนการตั้งค่า
