Difference between revisions of "คู่มือการตั้งค่า Cambium API เชื่อม EasyZone Cloud"
From EasyZone wiki
Easyhorpak (talk | contribs) (Created page with "มีวิธีการดังต่อไปนี้ 1. ทำการ login เข้าอุปกรณ์ cambium 2. กดเมนู Configure > Services 3...") |
Easyhorpak (talk | contribs) |
||
| (11 intermediate revisions by the same user not shown) | |||
| Line 1: | Line 1: | ||
| + | |||
| + | [[File:Cambium cnpilot e400 front.jpg|400px|thumb|center]] | ||
| + | |||
มีวิธีการดังต่อไปนี้ | มีวิธีการดังต่อไปนี้ | ||
| − | 1. | + | 1. เชื่อมอุปกรณ์เข้าระบบ network |
| + | |||
| + | Login เข้าอุปกรณ์ user : '''admin''' password : '''admin''' | ||
| + | |||
| + | [[File:Screenshot from 2017-12-09 22-16-08.png|400px|thumb|center]] | ||
| + | |||
2. กดเมนู Configure > Services | 2. กดเมนู Configure > Services | ||
| + | |||
| + | [[File:Capia.png|800px|thumb|center]] | ||
3. กรอกข้อมูลที่เมนู Location API | 3. กรอกข้อมูลที่เมนู Location API | ||
| + | |||
| + | [[File:Lapi.png|600px|thumb|center]] | ||
Enable คือ เลือกเพื่อเปิดระบบ | Enable คือ เลือกเพื่อเปิดระบบ | ||
| Line 14: | Line 26: | ||
หลังจากนั้นกด Save | หลังจากนั้นกด Save | ||
| + | |||
| + | 4. เข้าสู่ระบบ EasyZone Radius Billing (Cloud) | ||
| + | |||
| + | [[File:Lez.png|600px|thumb|center]] | ||
| + | |||
| + | 5. เลือก Hotspot และกดเมนู อุปกรณ์ | ||
| + | |||
| + | [[File:Dv2.png|600px|thumb|center]] | ||
| + | |||
| + | |||
| + | 6. ทำการเพิ่ม Profile ของอุปกรณ์ ตามภาพ | ||
| + | |||
| + | |||
| + | [[File:Cpr.png|600px|thumb]] | ||
| + | |||
| + | |||
| + | |||
| + | 7. ทำการเพิ่มข้อมูลอุปกรณ์ เลือก cloud profile และ กรอก mac address ของอุปกรณ์ (ค่า ESN และตามด้วย เครื่องหมาย : ตามภาพ) | ||
| + | |||
| + | |||
| + | mac address ที่กรอกจะต้องผ่านการเพิ่มเข้าระบบโดยทีมงาน EasyZone ก่อน | ||
| + | |||
| + | |||
| + | [[File:Adv2.png|800px|thumb|center]] | ||
| + | |||
| + | |||
| + | 8. ทดสอบการใช้งาน ระบบตามภาพ | ||
| + | |||
| + | [[File:Odv2.png|800px|thumb|center]] | ||
| + | |||
| + | [[File:Gdv.png|800px|thumb|center]] | ||
Latest revision as of 10:12, 7 February 2018
มีวิธีการดังต่อไปนี้
1. เชื่อมอุปกรณ์เข้าระบบ network
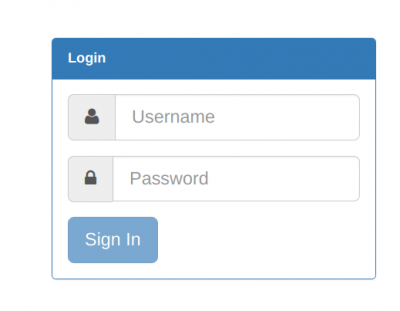
Login เข้าอุปกรณ์ user : admin password : admin
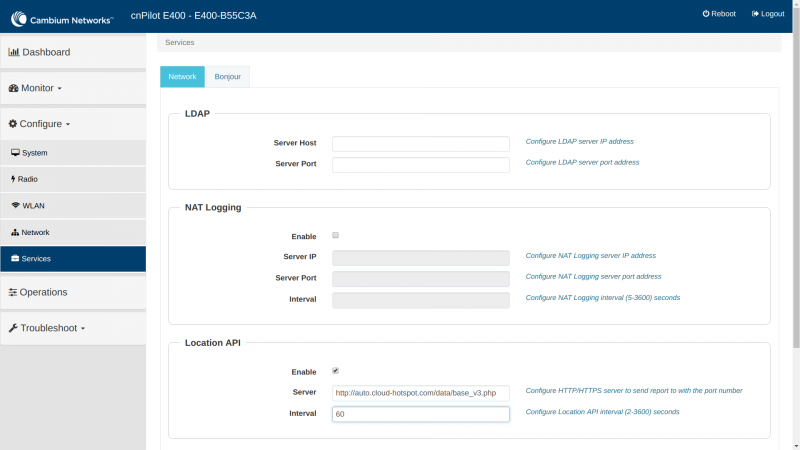
2. กดเมนู Configure > Services
3. กรอกข้อมูลที่เมนู Location API
Enable คือ เลือกเพื่อเปิดระบบ
Server คือ ตั้งค่า Url ของเพื่อให้ระบบ api ส่งค่า post ไป ในที่นี้ตั้งเป็น http://auto.cloud-hotspot.com/data/base_v3.php
Interval คือ จำนวนวินาทีที่มีการอัปเดท ตั้งเป็น 60
หลังจากนั้นกด Save
4. เข้าสู่ระบบ EasyZone Radius Billing (Cloud)
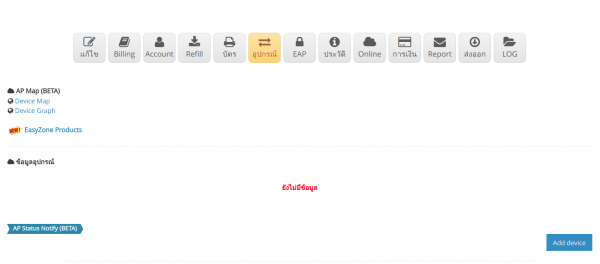
5. เลือก Hotspot และกดเมนู อุปกรณ์
6. ทำการเพิ่ม Profile ของอุปกรณ์ ตามภาพ
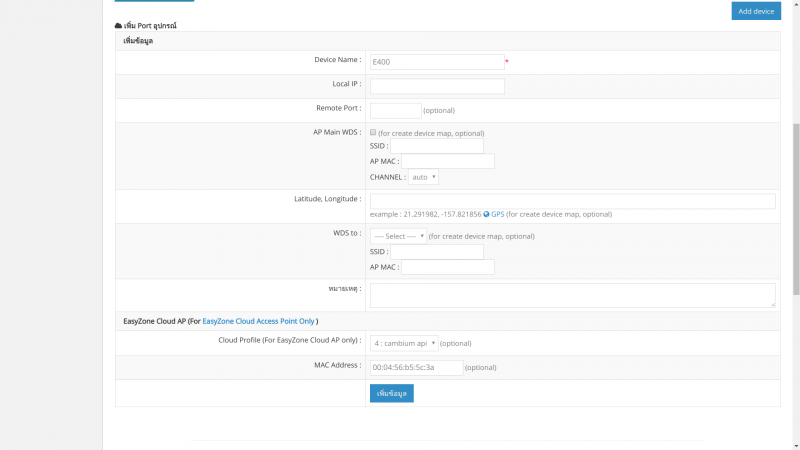
7. ทำการเพิ่มข้อมูลอุปกรณ์ เลือก cloud profile และ กรอก mac address ของอุปกรณ์ (ค่า ESN และตามด้วย เครื่องหมาย : ตามภาพ)
mac address ที่กรอกจะต้องผ่านการเพิ่มเข้าระบบโดยทีมงาน EasyZone ก่อน
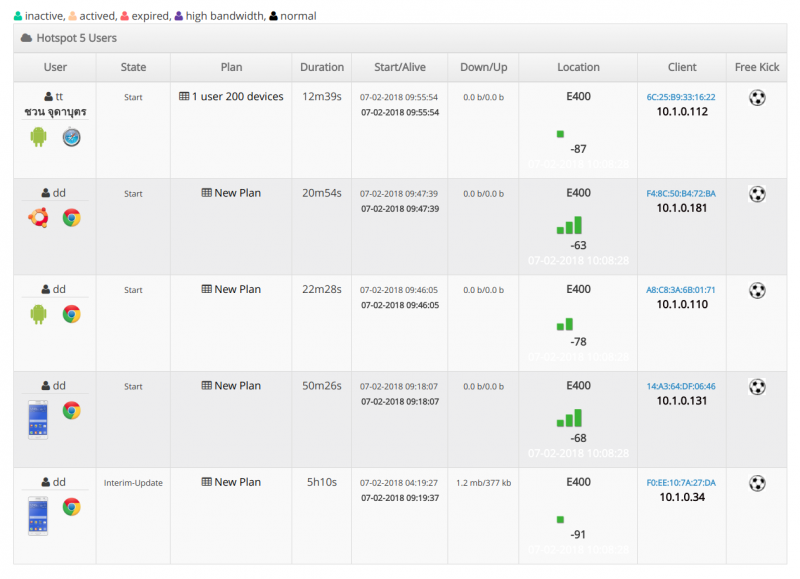
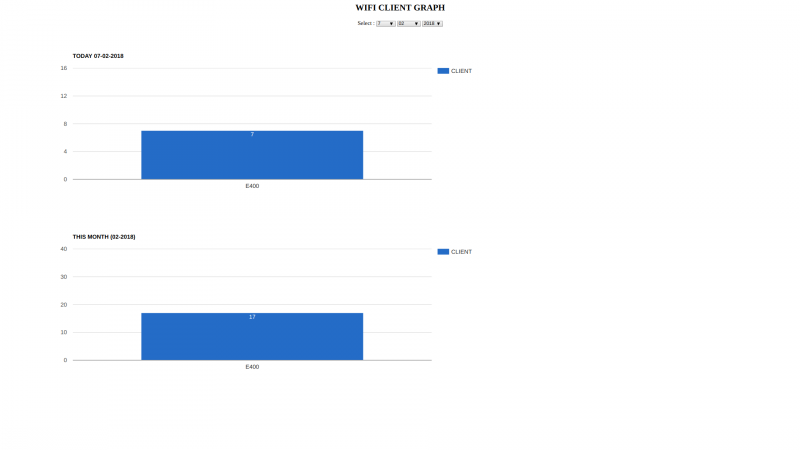
8. ทดสอบการใช้งาน ระบบตามภาพ
