Difference between revisions of "การตั้งค่า Hotspot ของระบบ"
Easyhorpak (talk | contribs) |
Easyhorpak (talk | contribs) |
||
| (3 intermediate revisions by the same user not shown) | |||
| Line 4: | Line 4: | ||
1. Login เข้าสู่ระบบ | 1. Login เข้าสู่ระบบ | ||
| − | [[File:Screenshot from | + | [[File:Screenshot from 2023-10-03 09-49-06.png|800px|thumb|center]] |
2. กดเมนู Hotspot > Hotspot | 2. กดเมนู Hotspot > Hotspot | ||
| − | [[File:Screenshot from | + | [[File:Screenshot from 2023-10-03 10-10-59.png|800px|thumb|center]] |
3. โดยปกติระบบจะตั้งค่า default ให้ หากต้องการเปลี่ยนแปลง ท่านสามารถแก้ไขค่าโดยการกดที่เมนู Edit และกรอกข้อมูลดังต่อไปนี้ | 3. โดยปกติระบบจะตั้งค่า default ให้ หากต้องการเปลี่ยนแปลง ท่านสามารถแก้ไขค่าโดยการกดที่เมนู Edit และกรอกข้อมูลดังต่อไปนี้ | ||
| Line 32: | Line 32: | ||
DNS : dns server ของระบบ | DNS : dns server ของระบบ | ||
| − | AUTHEN URL : | + | DNS NAME : ตั้งค่า portal โดเมน ที่ใช้ในการ Login เพื่อรองรับ HTTPS SSL |
| + | |||
| + | AUTHEN URL : Page ที่ใช้ในการ login เข้าระบบ authen มีให้เลือก 2 แบบ คือ Local หรือ EasyZone Portal | ||
Website Allow : url ที่ระบบตั้งค่าให้ bypass ได้โดยไม่ต้อง login ตัวอย่าง bill.cloud-hotspot.com,authen.cloud-kingit.com,bill.cloud-kingit.com,easyzonecorp.net,tmtopup.com,tmpay.com,kit.co.th | Website Allow : url ที่ระบบตั้งค่าให้ bypass ได้โดยไม่ต้อง login ตัวอย่าง bill.cloud-hotspot.com,authen.cloud-kingit.com,bill.cloud-kingit.com,easyzonecorp.net,tmtopup.com,tmpay.com,kit.co.th | ||
| Line 40: | Line 42: | ||
Cookie คือ ให้มีการจำค่า login และ login อัตโนมัติในการใช้งานครั้งต่อไป | Cookie คือ ให้มีการจำค่า login และ login อัตโนมัติในการใช้งานครั้งต่อไป | ||
| − | |||
| − | |||
Mac Authen คือการ login ผ่านระบบ mac authen | Mac Authen คือการ login ผ่านระบบ mac authen | ||
Authentication Type คือ การตั้งค่า login มาตรฐาน ตัวอย่าง CHAP PAP | Authentication Type คือ การตั้งค่า login มาตรฐาน ตัวอย่าง CHAP PAP | ||
| − | |||
| − | |||
| − | |||
| − | |||
| − | |||
| − | |||
| − | |||
| − | |||
| − | |||
| − | |||
| − | |||
| − | |||
| − | |||
| − | |||
Radius Setup การตั้งค่า Radius | Radius Setup การตั้งค่า Radius | ||
| Line 70: | Line 56: | ||
NAS ID : ค่า nasid ของ radius server เช่น 0012334C65F4 | NAS ID : ค่า nasid ของ radius server เช่น 0012334C65F4 | ||
| + | [[File:Screenshot from 2023-10-03 10-12-01.png|800px|thumb|center]] | ||
| − | [[File:Screenshot from | + | [[File:Screenshot from 2023-10-03 10-12-21.png|800px|thumb|center]] |
| − | |||
| − | |||
4. กด Save หลังจากนั้นกด Apply ให้ระบบ reboot เครื่อง 1 ครั้ง เป็นอันเสร็จขั้นตอน | 4. กด Save หลังจากนั้นกด Apply ให้ระบบ reboot เครื่อง 1 ครั้ง เป็นอันเสร็จขั้นตอน | ||
Latest revision as of 10:14, 3 October 2023
มีขั้นตอนดังต่อไปนี้
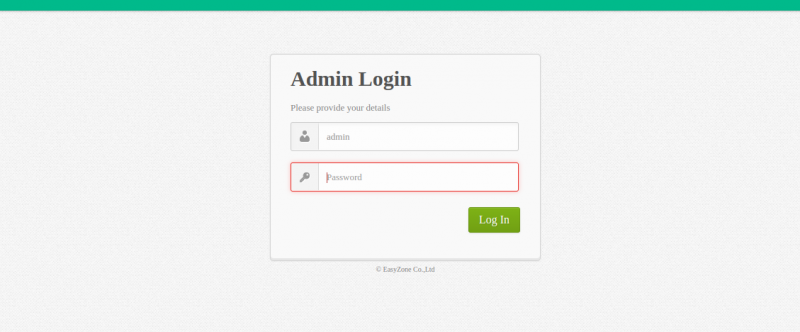
1. Login เข้าสู่ระบบ
2. กดเมนู Hotspot > Hotspot
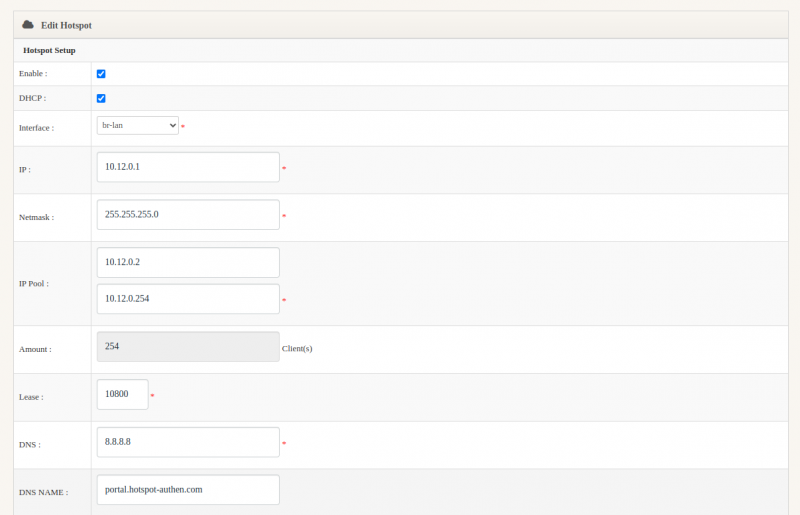
3. โดยปกติระบบจะตั้งค่า default ให้ หากต้องการเปลี่ยนแปลง ท่านสามารถแก้ไขค่าโดยการกดที่เมนู Edit และกรอกข้อมูลดังต่อไปนี้
Enable : คือการเปิดระบบ Hotspot หากไม่มีการเลือก enable ระบบจะใช้งานโดยไม่มีการ Authen
DHCP : คือ การเปิดระบบ dhcp server หากไม่มีการเลือก ระบบจะไม่มีการแจกไอพี
Interface : interface ในการใช้งานระบบ
IP : ip address ของระบบ
Netmask : netmask ของระบบ
IP Pool : ช่วง ip address ที่มีการแจก
Amount : จำนวน ip address ที่มีการแจก
Lease : เวลาในการใช้งาน ip
DNS : dns server ของระบบ
DNS NAME : ตั้งค่า portal โดเมน ที่ใช้ในการ Login เพื่อรองรับ HTTPS SSL
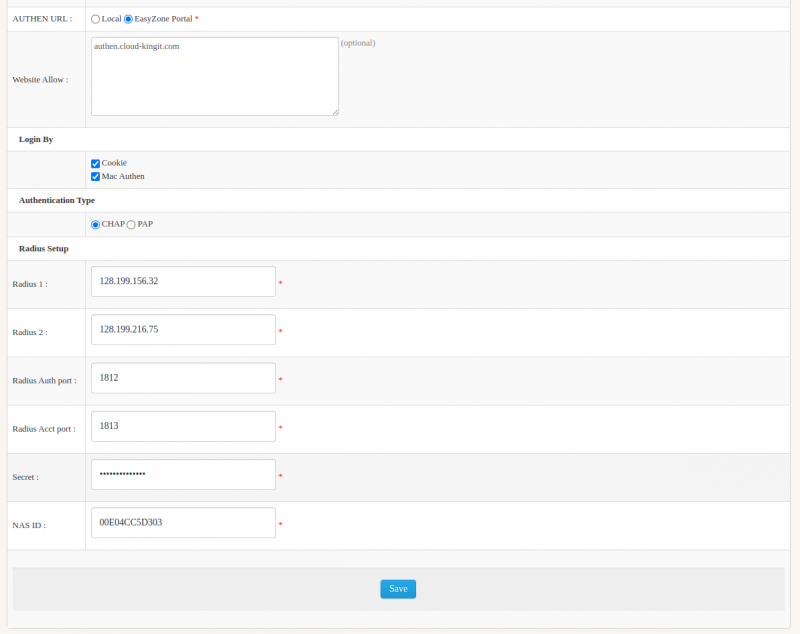
AUTHEN URL : Page ที่ใช้ในการ login เข้าระบบ authen มีให้เลือก 2 แบบ คือ Local หรือ EasyZone Portal
Website Allow : url ที่ระบบตั้งค่าให้ bypass ได้โดยไม่ต้อง login ตัวอย่าง bill.cloud-hotspot.com,authen.cloud-kingit.com,bill.cloud-kingit.com,easyzonecorp.net,tmtopup.com,tmpay.com,kit.co.th
Login By ระบบการตั้งค่า login แบบ พิเศษ
Cookie คือ ให้มีการจำค่า login และ login อัตโนมัติในการใช้งานครั้งต่อไป
Mac Authen คือการ login ผ่านระบบ mac authen
Authentication Type คือ การตั้งค่า login มาตรฐาน ตัวอย่าง CHAP PAP
Radius Setup การตั้งค่า Radius
Radius 1 : ip/domain ของ radius server 1 เช่น rad1.cloud-hotspot.com
Radius 2 : ip/domain ของ radius server 2 เช่น rad2.cloud-hotspot.com
Secret : ค่า secret ของ radius server เช่น easynangmud123
NAS ID : ค่า nasid ของ radius server เช่น 0012334C65F4
4. กด Save หลังจากนั้นกด Apply ให้ระบบ reboot เครื่อง 1 ครั้ง เป็นอันเสร็จขั้นตอน


