Difference between revisions of "การตั้งค่า EAP Authentication"
From EasyZone wiki
Easyhorpak (talk | contribs) |
Easyhorpak (talk | contribs) |
||
| (8 intermediate revisions by the same user not shown) | |||
| Line 1: | Line 1: | ||
| − | '''การตั้งค่า EAP Authentication''' | + | '''การตั้งค่า EAP Authentication ผ่านระบบ EasyZone Radius Billing''' |
| − | เพื่อความสะดวกในการใช้งานของลูกค้าระดับองกรค์ ที่ไม่ต้องการใช้งานระบบ Web authen | + | เพื่อความสะดวกในการใช้งานของลูกค้าระดับองกรค์ ที่ไม่ต้องการใช้งานระบบ Web authen ท่านสามรถตั้งค่าการ EAP Authentication ตามคู่มือด้านล่าง |
| − | ====1.ตั้งค่าอปุกรณ์ Access Point ของท่านแบบ WPA2 EAP ==== | + | ====1.ตั้งค่าอปุกรณ์ Access Point ของท่านแบบ WPA2 EAP (ดูค่าได้ในหน้าตั้งค่า ส่วน EAP)==== |
(ในที่นี้ใช้อุปกรณ์ Ubiquiti Pico Station M Firmware v6.0.4 ดาวโหลดน์ได้ที่ https://www.ubnt.com/download/airmax-m/picostationm) | (ในที่นี้ใช้อุปกรณ์ Ubiquiti Pico Station M Firmware v6.0.4 ดาวโหลดน์ได้ที่ https://www.ubnt.com/download/airmax-m/picostationm) | ||
| Line 11: | Line 11: | ||
[[File:Easyzone-eap-setting.png|800px|thumb|left|caption|EasyZone EAP Authentication Setting]] | [[File:Easyzone-eap-setting.png|800px|thumb|left|caption|EasyZone EAP Authentication Setting]] | ||
| + | <BR><BR><BR><BR><BR><BR><BR><BR><BR><BR><BR><BR><BR><BR><BR><BR><BR><BR><BR><BR><BR><BR><BR><BR> | ||
| − | ==== 2. ทำการตั้งค่า Device Name : ตามค่า Hotspot ของท่าน.==== | + | ==== 2. ทำการตั้งค่า Device Name : ตามค่า Hotspot ของท่าน (ดูค่าได้ในหน้าตั้งค่า ส่วน EAP).==== |
[[File:Easyzone-eap-deivce-name-setting.png|800px|thumb|left|caption|EasyZone EAP Authentication Device name Setting]] | [[File:Easyzone-eap-deivce-name-setting.png|800px|thumb|left|caption|EasyZone EAP Authentication Device name Setting]] | ||
| + | <BR><BR><BR><BR><BR><BR><BR><BR><BR><BR><BR><BR><BR><BR><BR><BR><BR><BR><BR><BR><BR><BR><BR><BR> | ||
| + | ==== 3. กด change และ กด apply.==== | ||
| + | |||
| + | |||
| + | ==== 4. การเชื่อมต่อโดย Android Phone==== | ||
| + | |||
| + | [[File:Select-eap.jpg|300px|thumb|left|caption|4.1 ทำการเลือก SSID เพื่อเชื่อมระบบ]] | ||
| + | [[File:Connect-eap.jpg|300px|thumb|left|caption|4.2 กรอก username password ]] | ||
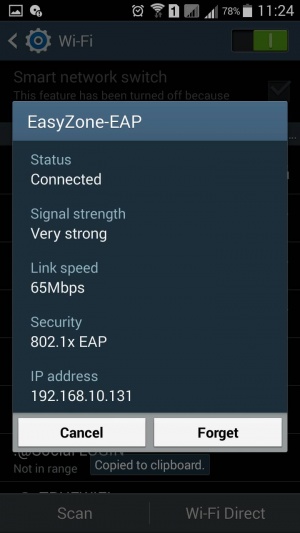
| + | [[File:Connected-eap.jpg|300px|thumb|left|caption|4.3 กด connect เพื่อเชื่อมระบบ]] | ||
| + | [[File:Eap-status.jpg|300px|thumb|left|caption|4.4 ระบบแสดงสถานะการเชื่อมแบบ EAP]] | ||
| + | |||
| + | <BR><BR><BR><BR><BR><BR><BR><BR><BR><BR><BR><BR><BR><BR><BR><BR><BR><BR><BR><BR><BR><BR><BR><BR> | ||
| + | <BR><BR><BR><BR><BR><BR><BR><BR><BR><BR><BR><BR><BR><BR><BR><BR><BR><BR><BR><BR><BR><BR><BR><BR> | ||
| + | <BR><BR><BR><BR><BR><BR><BR><BR><BR><BR><BR><BR><BR><BR><BR><BR><BR><BR><BR><BR><BR><BR><BR><BR> | ||
| + | <BR><BR><BR><BR><BR><BR><BR><BR><BR><BR><BR><BR><BR><BR><BR><BR><BR><BR><BR><BR><BR><BR><BR><BR> | ||
| + | <BR><BR><BR><BR><BR><BR><BR><BR><BR><BR><BR><BR><BR><BR><BR><BR><BR><BR><BR><BR><BR><BR><BR><BR> | ||
| + | |||
| + | หมายเหตุ : ระบบ EAP Authentication เหมาะสำหรับองค์กรหรือ การให้บริการลูกค้าแบบรายเดือน ไม่เหมาะใช้งานแบบรายวันหรือบริการระยะสั้น | ||
| + | การควบคุมแบนวินท์ต้องมีอุปกรณ์จัดการแบบวิดเพิ่มเติม | ||
Latest revision as of 12:40, 17 May 2017
การตั้งค่า EAP Authentication ผ่านระบบ EasyZone Radius Billing
เพื่อความสะดวกในการใช้งานของลูกค้าระดับองกรค์ ที่ไม่ต้องการใช้งานระบบ Web authen ท่านสามรถตั้งค่าการ EAP Authentication ตามคู่มือด้านล่าง
Contents
1.ตั้งค่าอปุกรณ์ Access Point ของท่านแบบ WPA2 EAP (ดูค่าได้ในหน้าตั้งค่า ส่วน EAP)
(ในที่นี้ใช้อุปกรณ์ Ubiquiti Pico Station M Firmware v6.0.4 ดาวโหลดน์ได้ที่ https://www.ubnt.com/download/airmax-m/picostationm)
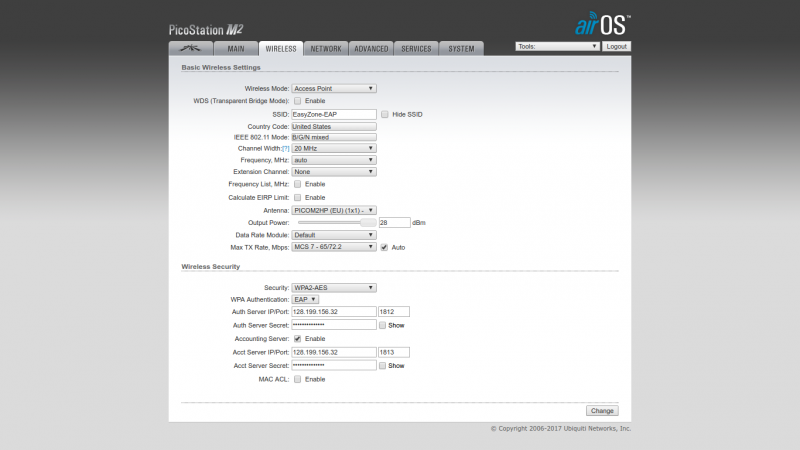
เข้าไปที่เมนู Wireless ตั้งค่าตามภาพ
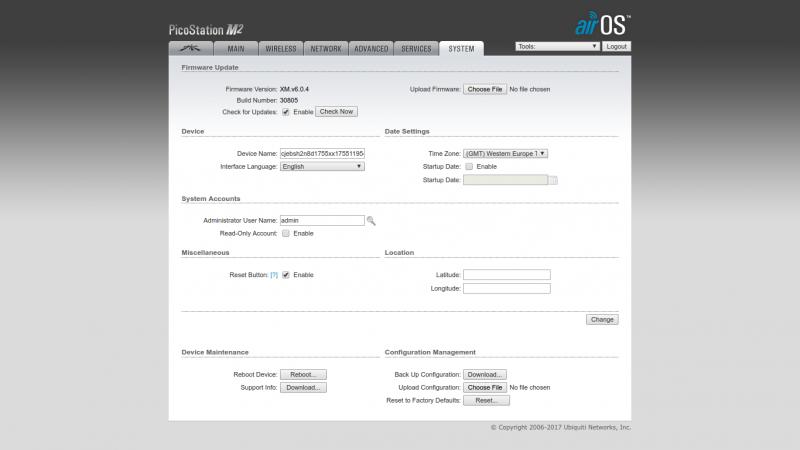
2. ทำการตั้งค่า Device Name : ตามค่า Hotspot ของท่าน (ดูค่าได้ในหน้าตั้งค่า ส่วน EAP).
3. กด change และ กด apply.
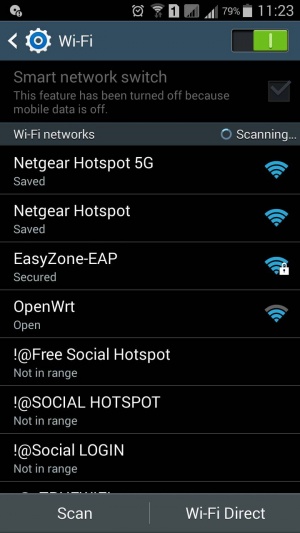
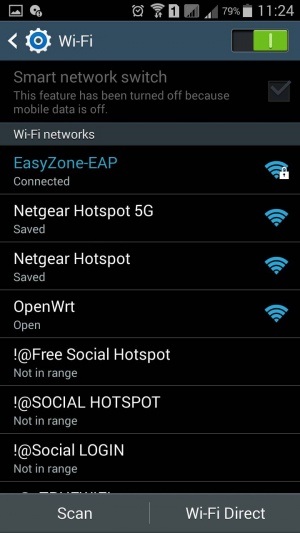
4. การเชื่อมต่อโดย Android Phone
หมายเหตุ : ระบบ EAP Authentication เหมาะสำหรับองค์กรหรือ การให้บริการลูกค้าแบบรายเดือน ไม่เหมาะใช้งานแบบรายวันหรือบริการระยะสั้น การควบคุมแบนวินท์ต้องมีอุปกรณ์จัดการแบบวิดเพิ่มเติม
