Difference between revisions of "คู่มือการลง firmware กับ Netgear R6220"
Easyhorpak (talk | contribs) |
Easyhorpak (talk | contribs) |
||
| (11 intermediate revisions by the same user not shown) | |||
| Line 1: | Line 1: | ||
| − | |||
'''คำแนะนำควร reset default อุปกรณ์ เพื่อให้อุปกรณ์ได้ ip 192.168.1.1 ก่อนทำการลง firmware และ ไม่ต่อ internet เข้าอุปกรณ์''' | '''คำแนะนำควร reset default อุปกรณ์ เพื่อให้อุปกรณ์ได้ ip 192.168.1.1 ก่อนทำการลง firmware และ ไม่ต่อ internet เข้าอุปกรณ์''' | ||
| + | '''ติดตั้งผ่านระบบ Telnet:''' | ||
| − | + | 1.โหลด firmware ที่ openwrt | |
| − | + | โดยโหลดไฟล์ | |
| − | + | http://auto.cloud-hotspot.com/v3_2/r6220/r6220-kernel.bin | |
| − | + | http://auto.cloud-hotspot.com/v3_2/r6220/r6220-rootfs.bin | |
คัดลอกไฟล์ r6220-kernel.bin และ r6220-rootfs.bin ลง USB flash disk และเสียบไปที่ พอท USB ของ router | คัดลอกไฟล์ r6220-kernel.bin และ r6220-rootfs.bin ลง USB flash disk และเสียบไปที่ พอท USB ของ router | ||
| − | 2. เข้าเว็บ http:// | + | |
| + | 2. เข้าเว็บ http://192.168.1.1/setup.cgi?todo=debug (หากระบบให้กรอก username ให้กรอก รหัสโรงงาน: admin - password) | ||
| + | |||
| + | IP : 192.168.1.1 คือ ip ของ router netgear r6220 หากท่านได้เปลี่ยนเป็นไอพี อื่น ให้ใช้ IP ที่ท่านเปลี่ยนแทน 192.168.1.1 | ||
3. ในหน้าเว็บจะแสดงข้อความ “Debug Enabled!” | 3. ในหน้าเว็บจะแสดงข้อความ “Debug Enabled!” | ||
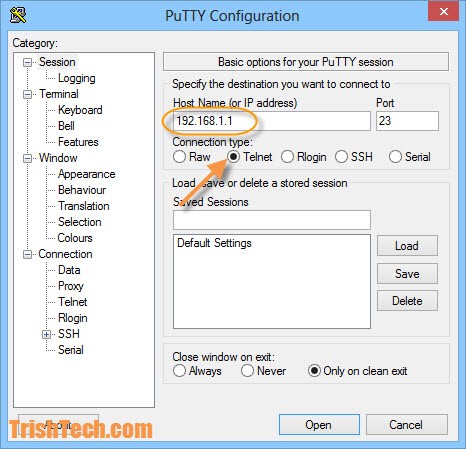
| − | 4. telnet ไปที่ IP-address ของ router และ login username “root” (รหัสโรงงาน: admin - password) | + | 4.ดาวน์โหลดโปรแกรม putty ที่ https://the.earth.li/~sgtatham/putty/latest/w32/putty.exe รันโปรแกรม แล้วเลือก telnet ตามภาพ หลังจากนั้น กรอก ip ตามภาพ |
| + | |||
| + | [[File:Reboot-router-telnet-0.jpg|600px|thumb|center]] | ||
| + | |||
| + | |||
| + | telnet ไปที่ IP-address ของ router และ login username “root” (รหัสโรงงาน: admin - password) | ||
5. ใช้คำสั่ง ls /mnt/shares/ เพื่อแสดง path ของ USB | 5. ใช้คำสั่ง ls /mnt/shares/ เพื่อแสดง path ของ USB | ||
| − | 6. ใช้คำสั่ง cd /mnt/shares/ | + | 6. ใช้คำสั่ง cd /mnt/shares/U |
7. พิมพ์คำสั่ง mtd_write write r6220-rootfs.bin Rootfs | 7. พิมพ์คำสั่ง mtd_write write r6220-rootfs.bin Rootfs | ||
| Line 29: | Line 37: | ||
8. พิมพ์คำำสั่ง mtd_write write r6220-kernel.bin Kernel | 8. พิมพ์คำำสั่ง mtd_write write r6220-kernel.bin Kernel | ||
| − | 9. พิมพ์คำสั่ง reboot | + | 9. พิมพ์คำสั่ง reboot |
| + | |||
| + | เป็นอันเสร็จขั้นตอน | ||
| + | |||
| − | |||
| + | '''การอัปเดทครั้งต่อไป''' | ||
| − | + | [http://bill.cloud-hotspot.com/wiki/index.php/%E0%B8%81%E0%B8%B2%E0%B8%A3%E0%B8%AD%E0%B8%B1%E0%B8%9B%E0%B9%80%E0%B8%94%E0%B8%97_firmware คู่มือการอัปเดท firmware] | |
| − | |||
| − | + | ที่มา https://openwrt.org/toh/netgear/netgear_r6220 | |
Latest revision as of 11:02, 3 October 2023
คำแนะนำควร reset default อุปกรณ์ เพื่อให้อุปกรณ์ได้ ip 192.168.1.1 ก่อนทำการลง firmware และ ไม่ต่อ internet เข้าอุปกรณ์
ติดตั้งผ่านระบบ Telnet:
1.โหลด firmware ที่ openwrt
โดยโหลดไฟล์
http://auto.cloud-hotspot.com/v3_2/r6220/r6220-kernel.bin
http://auto.cloud-hotspot.com/v3_2/r6220/r6220-rootfs.bin
คัดลอกไฟล์ r6220-kernel.bin และ r6220-rootfs.bin ลง USB flash disk และเสียบไปที่ พอท USB ของ router
2. เข้าเว็บ http://192.168.1.1/setup.cgi?todo=debug (หากระบบให้กรอก username ให้กรอก รหัสโรงงาน: admin - password)
IP : 192.168.1.1 คือ ip ของ router netgear r6220 หากท่านได้เปลี่ยนเป็นไอพี อื่น ให้ใช้ IP ที่ท่านเปลี่ยนแทน 192.168.1.1
3. ในหน้าเว็บจะแสดงข้อความ “Debug Enabled!”
4.ดาวน์โหลดโปรแกรม putty ที่ https://the.earth.li/~sgtatham/putty/latest/w32/putty.exe รันโปรแกรม แล้วเลือก telnet ตามภาพ หลังจากนั้น กรอก ip ตามภาพ
telnet ไปที่ IP-address ของ router และ login username “root” (รหัสโรงงาน: admin - password)
5. ใช้คำสั่ง ls /mnt/shares/ เพื่อแสดง path ของ USB
6. ใช้คำสั่ง cd /mnt/shares/U
7. พิมพ์คำสั่ง mtd_write write r6220-rootfs.bin Rootfs
8. พิมพ์คำำสั่ง mtd_write write r6220-kernel.bin Kernel
9. พิมพ์คำสั่ง reboot
เป็นอันเสร็จขั้นตอน
การอัปเดทครั้งต่อไป
